Masthead header


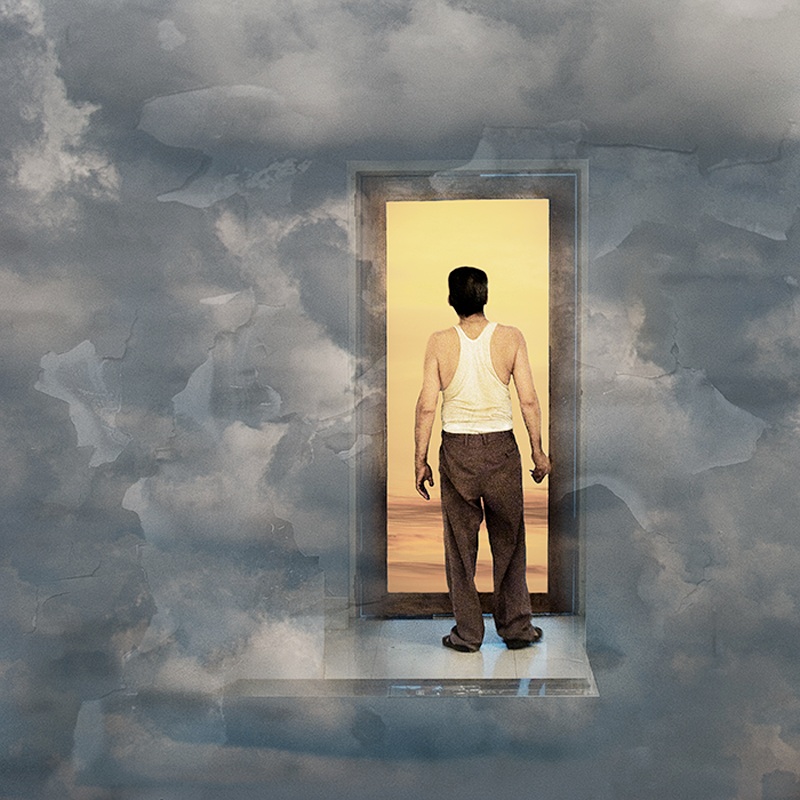
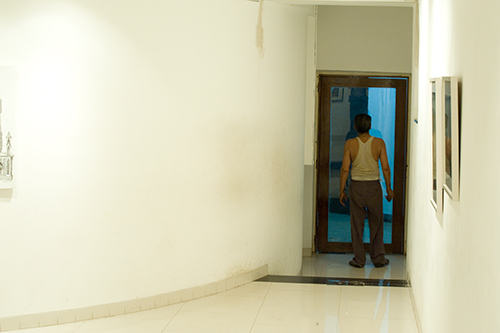
This shot was taken in an Art Gallery in India in 2009. The Man was about to clean the glass in the door. (See the original image below). I took several of him and worked on them unsuccessfully a while back. Recently, I remembered the blue showing through glass and thought it looked like the sky. I went back to the image and found it wasn’t all as blue as I remembered it but I decided to work on it to portray him standing at a doorway where the outside was very different to the inside – beckoning him through to a brighter world.

After cropping the image to a square format, I straightened it up, used the Nik Cross processing filter and Viveza to adjust the lighting and cloned out some of the detail in the original. I then added two layers over the top, a sky layer and a peeling wall layer. The opacity of these was adjusted to give the effect I wanted. I then selected the man and the doorway together with some of the floor he was standing on from a previous layer and placed it on top of the texture layers . A layer mask was used to allow some of the texture layers to overlap the doorway.

I decided to replace the blue showing through the glass in the door with a bright orange sunset from another shot I took in India and I use a layer mask on that so that the orange sky showed only where the glass in the door was. Curves, brightness/ contrast, hue / saturation and selective colour layers were then used to adjust the image to look the way I wanted it to. Finally, it was sharpened using high pass filter.

This image has had 11 International acceptances including a PSNZ Ribbon Creative at the 30 New Zealand International Salon 2019.


The-Door-to-Beyond-original


Pin to Pinterest

The Escape

This image was taken in Havana in 2011.

I really liked the way the boy had a slight amount of motion blur (see the original image below) and I wanted to create a feeling of his escaping from the frame. After some experimentation, I decide to try to create a feeling of ‘disaster’ by moving parts of the stairs, as if it were in an earthquake.

After cropping the image so that it was square, I used Photoshop ‘Transform’ to correct the horizontals and verticals, followed by Nik Glamour Glow to give a slightly dreamy feel. The latter was removed from the stairs and the boy himself using a layer mask. I then used Nik Viveza to change the lighting to shift the emphasis to the top left hand corner of the image in an attempt to create a feeling that he was escaping from the darkness into the light.

Then, a small block of the image was selected, put on a separate layer and moved to misalign it with the rest of the image. This was done a further 27 times to create the disjointed areas in various parts of the image.

An unadjusted Viveza layer was then created. I use this frequently in my images. It has the same effect as flattened the image at this point whilst still preserving all the layers below so I can go back to them if I need to take the development of the image back to an earlier stage and work again from that point. I normally title this ‘Viveza Block’.

Further adjustments were carried out using a combination of cloning, Viveza, Darken/ Lighten Centre and Glamour Glow. These were following by a bleach bypass layer, removing  the effect in  places using a layer mask, to give the image an ‘edginess’. Further adjustments to the lighting were made with Viveza and curves before sharpening the image with High Pass Filter.

This image has had 6 International acceptances and won the Paul Keene FRPS Award in the Royal Photographic Society Visual Art Group Exhibition 2013.

Nikon D700, 28-300mm lens at 28mm, ISO 3200, f/11, 1/60sec

The-Escape-original

Pin to Pinterest


This was taken in Edinburgh. I noticed the interesting passageway with people walking up and down it regularly. I thought I could get an interesting image so I crouched at the end and took a number of shots – no-one seemed to mind and one woman commented that this was the sort of thing her husband did.

I thought that the positioning of the man in this shot was good (see the original image below) so I decided to develop it.

I used transform to straighten up the image and then cropped it to a square format. The Nik Glamour Glow filter was then applied to give it a slightly dreamy quality and a layer mask was use to remove the effect from the man and reduce it in other parts of the image.

Colourise was then applied to give an overall orange feel and Viveza was used to brighten up the area around the man to draw attention to him. The texture was then added and curves used to increase the contrast.

A further Viveza layer was the used the make final adjustments to the lighting and minor distractions were cloned out. Final adjustments to the contrast were made using Nik Pro-Contrast and finally the High-pass filter was used, with a layer mask, to sharpen the man.

This image has had 13 International acceptances including the London Salon of Photography 2010 and a Diploma at 47e Challenge du Photo-Club Esch Salon Mondial 2011 (Luxembourg).

Nikon D700, 28-300mm lens at 28mm, ISO 450, f/8, 1/125sec


The-Man-in-the-Passageway-original

Pin to Pinterest

A Woman and a Man


I try hard to get a sense of a story in my images. Not to spell it out but to make people wonder what the story is and let them interpret it as they will. In this case, I suspect there is no connection between the two people. It is a candid shot taken as I was sitting in a café in Yokohama looking at the world go by and waiting for photo opportunities to present themselves (See the original image below).

She was reading the newspaper and he was someway off telephoning someone. There were many people doing that against the windows in the area, presumably to get a good signal, but I feel the image does invite the viewer to find a connection and make up their own story.

It was taken in the Spring of 2010 on a Nikon D700 with a 24 mm – 70 mm Sigma lens on 32 mm at  f/2.8 and 1/500 sec. I created the final image first by cropping to the composition I wanted. I then cloned out various distractions; a plastic bag on the chair (which included reconstructing the chair arm), the object on the table, some of the reflection on the floor which I found distracting, and the pole of a parasol which appeared to be coming out of the top of her head. I then used three Nik Filters, Darken /Lighten Centre (to brighten the image up), Viveza (to desaturate the foliage in parts of the background) and Glamour Glow (which gives the image a slightly dreamy feel). Finally, the image was sharpened using the Photoshop High Pass Filter.

This image has had 18 international acceptances including the RPS International Projected Image Exhibition 2012, two gold medals: Zajecar 2010 (Serbia) and BOR 2011 (Serbia), a ribbon: Kumanovo 2011 (Macedonia) and an Honourable Mention: Toronto 2011 (Canada)


A-Woman-and-a-Man-original


Pin to Pinterest

This was taken at Paddington Station in London in 2007. I wanted to capture the contrast between the stationary train and woman, and the moving figures. So, I rested my Nikon D70 on the rail of the bridge I was standing on and shot the image using 70-300mm lens at 145mm, 2.5s at f/8.

It has been one of my more successful international images with 19 international acceptances including the Royal Photographic Society International Projected Image Exhibition 2009 (UK), The London Salon of Photography 2010 (England) and a bronze medal at the 8th International Exhibition – Rock 2012 (Serbia).


Pin to Pinterest